Learn how to implement Single Sign-On between AWS Cognito and Salesforce for a seamless user experience with complete step-by-step instructions.
AWS Cognito Identity Provider Documentation
Introduction
Single Sign-On (SSO) between AWS Cognito and Salesforce can eliminate multiple login prompts. This guide will walk through the complete setup process, core concepts and implementation details for someone dives into the sso setup for the first time.
Understanding AWS Cognito Components
User Pools: The base of authentication
A User Pool is Cognito’s user directory that handles:
- User registration and account creation
- Authentication (username/password validation)
- User attributes storage (email, phone, custom fields)
- Security features (MFA, password policies)
Think of a User Pool as your base database of users which answers the “who are you?” part of authentication.
App Clients: The Connectors
Many beginners wonder why App Clients are needed when User Pools already manage users. (at least it was for me) Let’s break it down:
An App Client defines:
- Which applications can use your User Pool
- What authentication flows are allowed (e.g., user password, refresh tokens)
- Token expiration settings
- Callback URLs (where users return after authentication)
- OAuth scopes (what user information can be accessed)
App Clients act as bridges between your applications and the User Pool that is answering the “how” and “where” authentication happens.
External Identity Providers (IdPs)
When you connect external providers like Google to your User Pool, you’re creating a “federation” where:
- Users authenticate with their existing accounts
- Cognito receives verification from the external provider
- Cognito creates or maps to a user in its User Pool
- Cognito issues its own tokens for your applications
Authentication Flow Overview
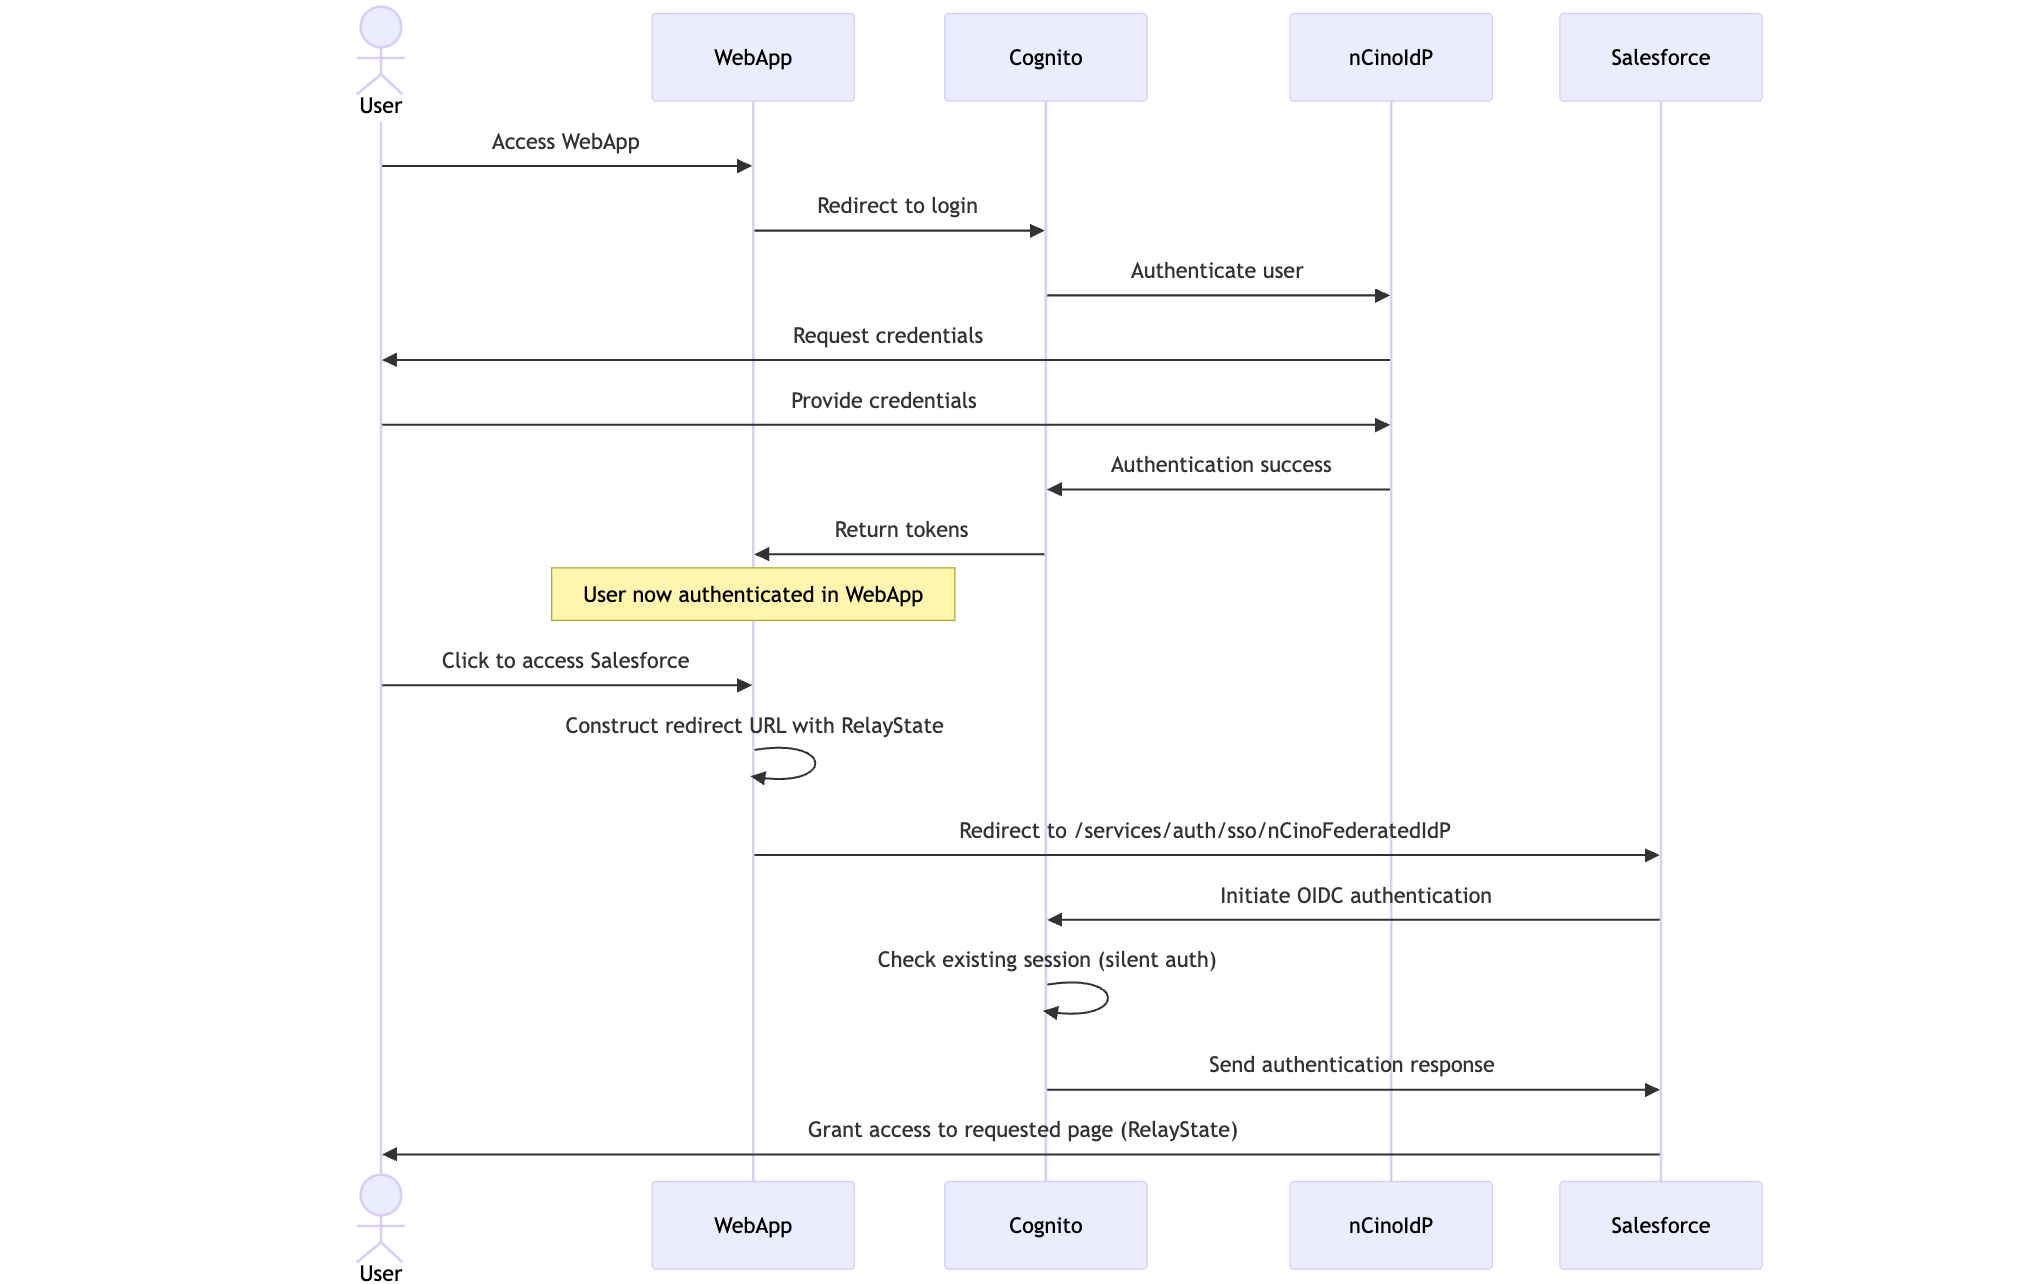
Step-by-Step Configuration Guide
1. Configuring AWS Cognito
User Pool Setup
- Create or use an existing User Pool
- Ensure your external IdP (Google) is already configured
- Note your User Pool ID (format:
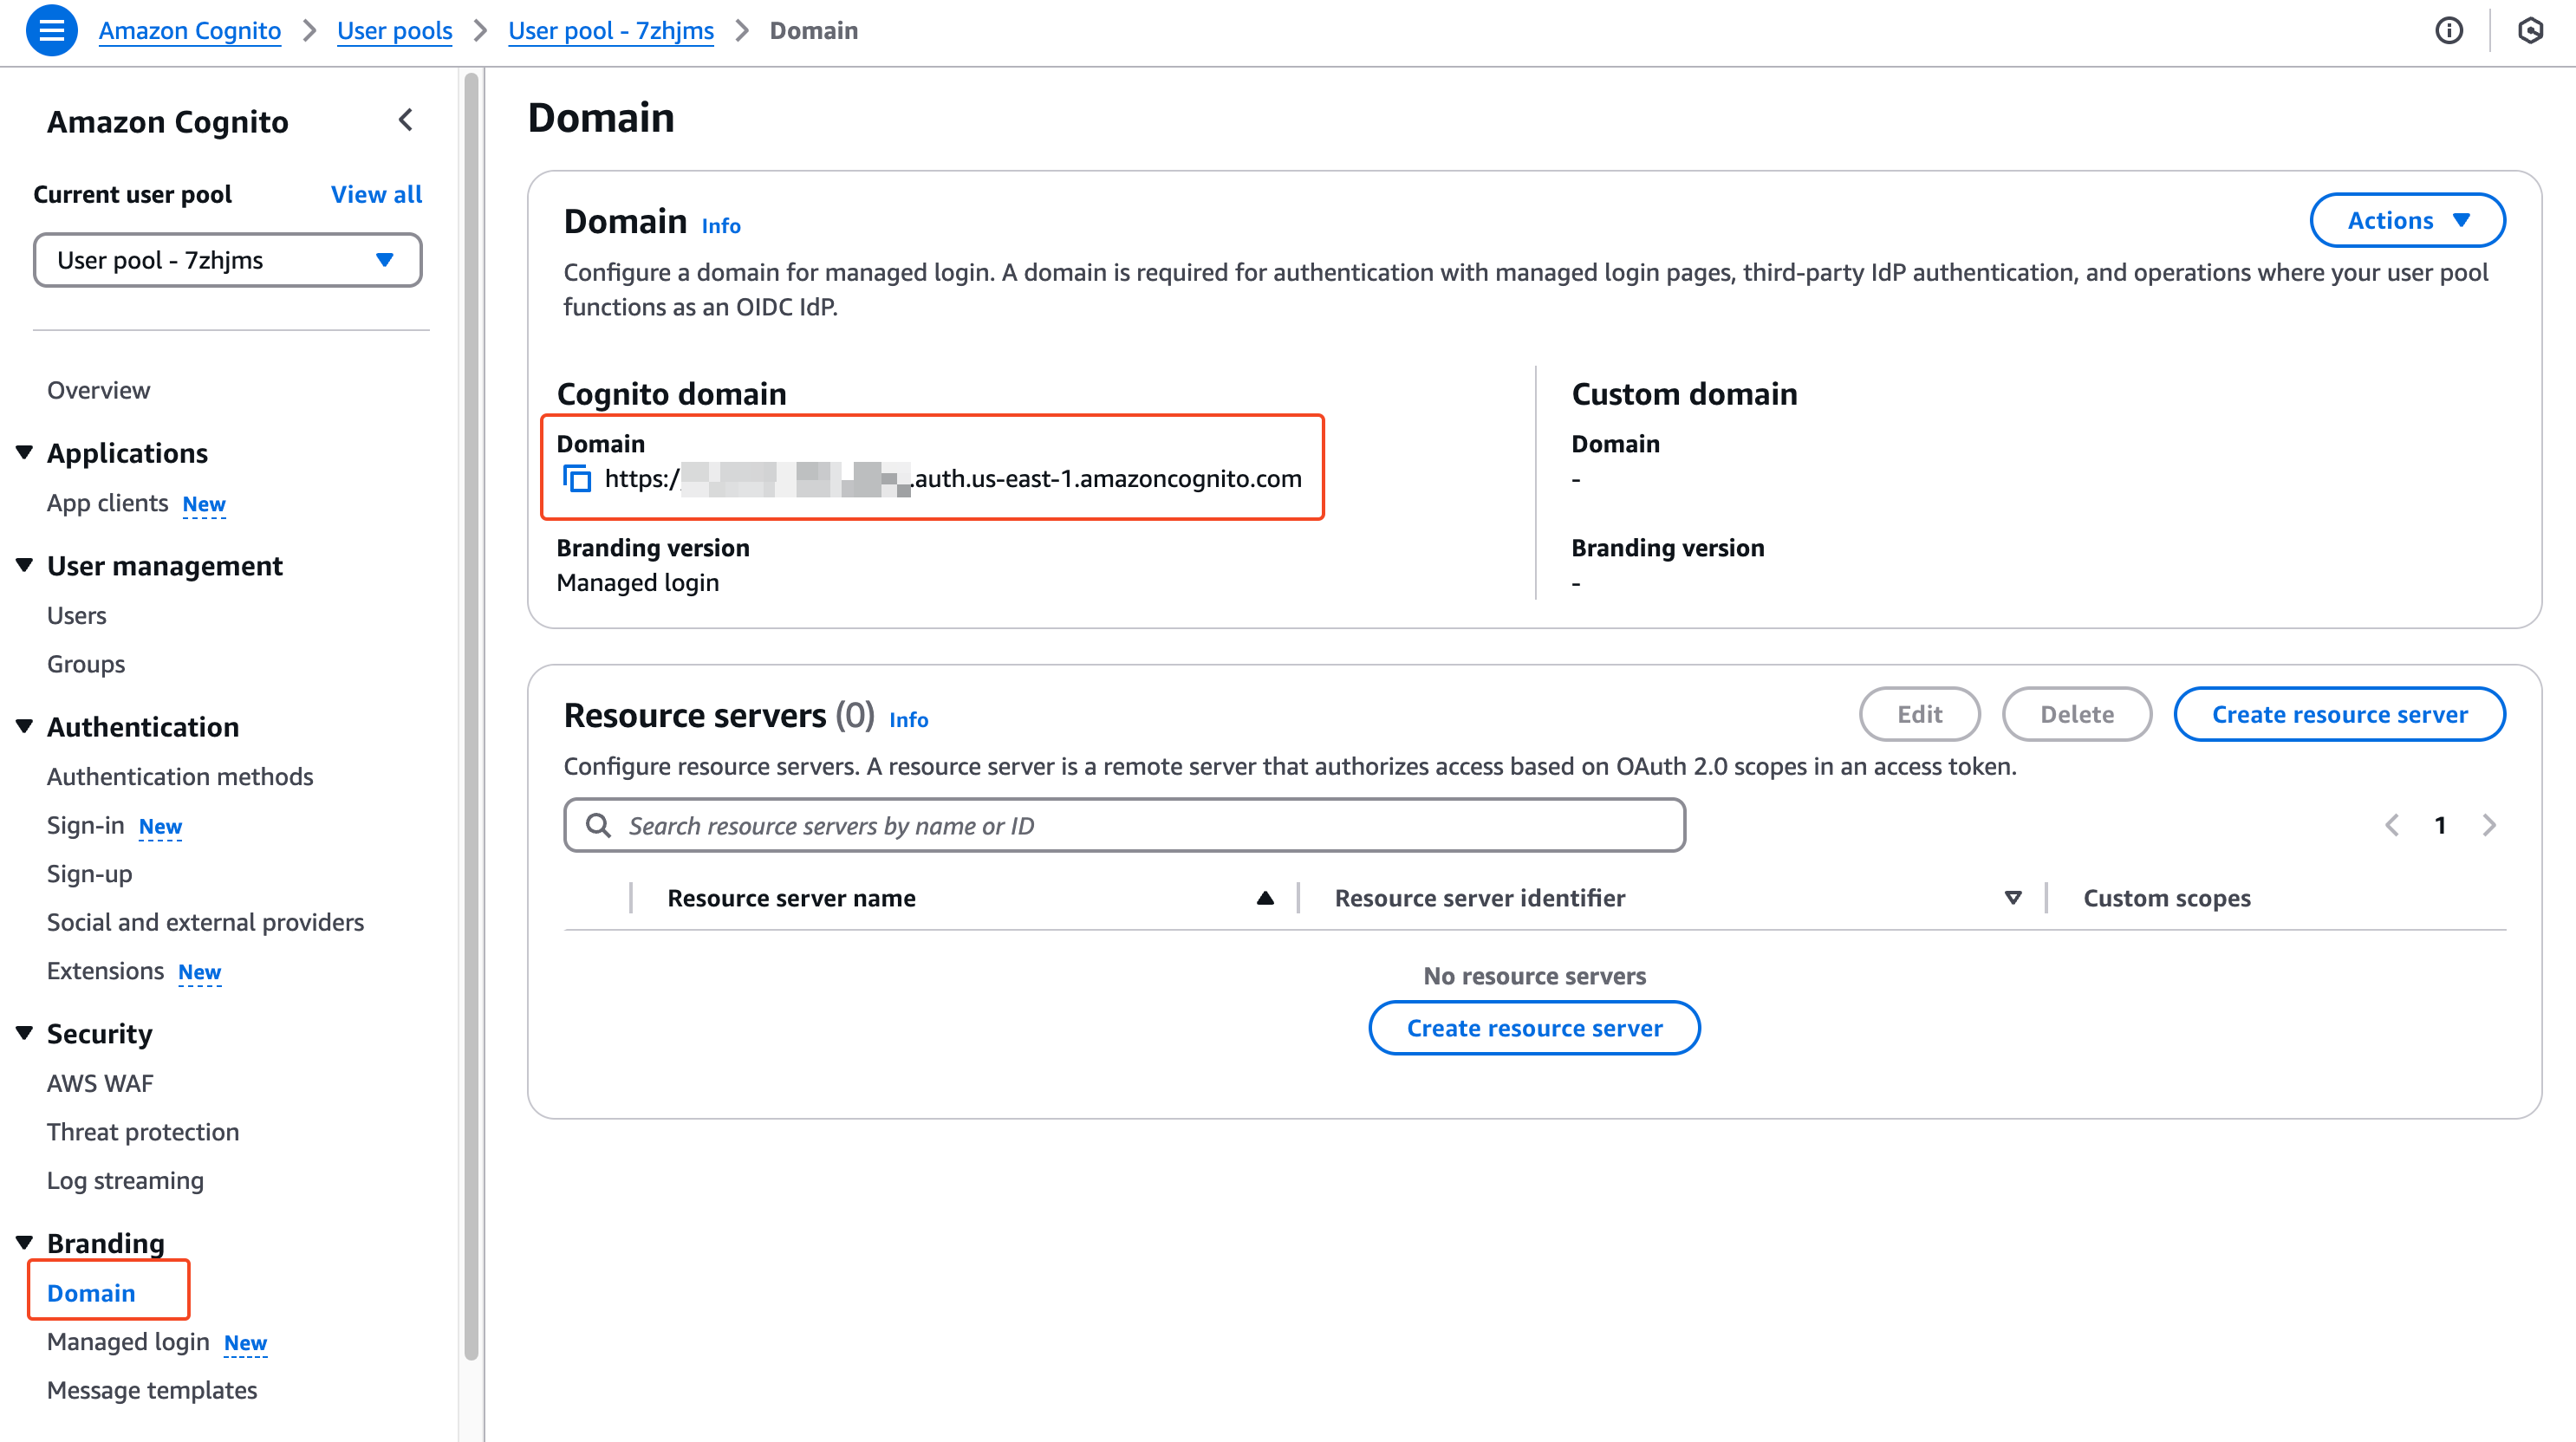
region_alphanumerice.g.us-east-1_1234567890) - Locate and save your User Pool Domain (format:
https://your-domain.auth.region.amazoncognito.come.g.https://my-domain.auth.us-east-1.amazoncognito.com)- where to find it: your User Pool > Branding > Domain
App Client Configuration
- Create a new App Client in your User Pool
- Enable the OAuth 2.0 flows (Authorization code grant)
- Add Salesforce’s callback URL as an allowed callback (we’ll get this later; I promise :) )
- Enable the necessary OAuth scopes:
openid(required)emailprofile
- Save your App Client ID
- Note the full OAuth Endpoints from the App Integration > App client settings page
- e.g.
- Authorization Endpoint:
https://my-domain.auth.us-east-1.amazoncognito.com/oauth2/authorize - Token Endpoint:
https://my-domain.auth.us-east-1.amazoncognito.com/oauth2/token - User Info Endpoint:
https://my-domain.auth.us-east-1.amazoncognito.com/oauth2/userInfo
2. Configuring Salesforce
Create Auth Provider in Salesforce
Go to Setup > Identity > Auth. Providers
Create a new Auth Provider of type OpenID Connect
Name it
myFederatedIdP(or your preferred name)Enter details from Cognito:
- Consumer Key: Your Cognito App Client ID (e.g.
1234567890) - Consumer Secret: Your Cognito App Client Secret (e.g.
1234567890) - Authorize Endpoint URL: The OAuth authorization endpoint from Cognito (e.g.
https://my-domain.auth.us-east-1.amazoncognito.com/oauth2/authorize) - Token Endpoint URL: The OAuth token endpoint from Cognito (e.g.
https://my-domain.auth.us-east-1.amazoncognito.com/oauth2/token) - User Info Endpoint URL: The OAuth userinfo endpoint from Cognito (e.g.
https://my-domain.auth.us-east-1.amazoncognito.com/oauth2/userInfo) - Default Scopes:
openid email profile - Custom Error URL: Your error handling page
- Registration Handler: Your custom Apex class (required for Salesforce to register/find users)
- Salesforce automatically creates a default one for you if you toggle the switch on.
- You can customize it to your needs!
- Make sure you have this Apex class by going to Setup > Apex Classes and search for e.g.
CognitoRegistrationHandler.
- Salesforce automatically creates a default one for you if you toggle the switch on.
- Execute Registration As: A designated Salesforce user
- Consumer Key: Your Cognito App Client ID (e.g.
Save the configuration
Update Cognito with Salesforce Callback URL
After creating the Auth. Provider in Salesforce, it will generate callback URLs. Find the Callback URL (format: https://your-domain.my.salesforce.com/services/authcallback/myFederatedIdP).
- Return to AWS Cognito Console
- Open your User Pool > App clients
- Select your App client
- Add this Salesforce callback URL to the “Callback URLs” field
- Save the changes
3. Implementing the Redirect in Your Application
Using the redirect service pattern from the WebApp:
| |
Common Pitfalls and Solutions
- Token Format Issues: Ensure your Cognito tokens include required user claims
- Callback URL Mismatch: Verify exact match between Salesforce and Cognito URLs
- Relative Path Requirements: Salesforce needs relative paths in the startURL parameter (e.g.
/lightning/page) - Authorization Scopes: Verify
openidscope is enabled for proper OIDC authentication
Wrapping it up 👏
Working on SSO is quite challenging because every bit of information should be correct and match. Even if one of them is off, it won’t work. But the advantage of SSO is that once you set it up, it will improve user experience and reduce the number of login prompts which is huge. I hope this guide helps you to understand the core concepts and implementation details of SSO between AWS Cognito and Salesforce.
Cheers! 🍺